Learning Lessons with Mrs. Labrasciano Home Shop Instagram Pinterest Email Image Map

ELA Lesson Plans #1


Click here to learn all about teaching ELA in the 2nd grade classroom.  These free and fun lesson plans will detail curriculum and ideas for all informational, literature and writing standards in my elementary classroom.  Your second grade students will the love the lessons and activities shared here.  These lesson outlines are added and updated almost each week.

Hi everyone! I've decided to share my lesson plan outlines with everyone each week or at least as often as I can.  If you aren't signed up for my newsletter, please sign up now.  I'll send the lesson plans and free resources out each month for you to have.  If my newsletter opt-in doesn't pop up for you, just email me and I'll add you to the list.  My hope is that we can collaborate and make the best learning experience possible for students.  You will definitely find lesson ideas and outlines in these series of posts.  You will not find detailed plans in these posts, but you will find links to my detailed units in my TPT store.  The following lesson plan templates are from A Modern Teacher.

Just like every teacher at back to school time I'm spinning my wheels and working through my exhaustion to get my plans up, going and best suited for students.  Please be patient with me.  Below you will find a very rough draft of my yearly plans.  As the next month goes by I will be updating these outlines and replacing them.


The first two weeks of my lesson plans are short.  My main focus is building a classroom culture with students and going over procedures with students that will set them up for success.  In my lesson outlines you will see T for teacher and Ss for students.

 Click here to learn all about teaching ELA in the 2nd grade classroom.  These free and fun lesson plans will detail curriculum and ideas for all informational, literature and writing standards in my elementary classroom.  Your second grade students will the love the lessons and activities shared here.  These lesson outlines are added and updated almost each week.

Click here to learn all about teaching ELA in the 2nd grade classroom.  These free and fun lesson plans will detail curriculum and ideas for all informational, literature and writing standards in my elementary classroom.  Your second grade students will the love the lessons and activities shared here.  These lesson outlines are added and updated almost each week.

The first week of writing is most successful when procedures are created to set students up for success.  My main focus is on teaching students proper penmanship and a love for writing.  Youtube has a ton of videos that you can use to walk students through handwriting instruction.

Click here to learn all about teaching ELA in the 2nd grade classroom.  These free and fun lesson plans will detail curriculum and ideas for all informational, literature and writing standards in my elementary classroom.  Your second grade students will the love the lessons and activities shared here.  These lesson outlines are added and updated almost each week.

Clean and Protect Your Classroom Carpet


Almost every classroom teacher knows the woes of keeping their rugs looking decent.  The rug in the picture above is 4 years old.  One of the ways that I keep my rug stain free is to clean it yearly with my household steam cleaner and spray Scotchgard on it afterward.  I recommend spraying the stain protector just before you leave for the weekend because it is very pungent.

Follow these simple steps:
1.  Vacuum your carpet.
2.  Spray your spots or stains with stain remover and follow directions for recommended soaking time.
3.  Clean the rug with a carpet cleaner.  If you don't have one many grocery stores rent them out.
4.  Once the carpet is completely dry follow the directions for spraying Scotchgard on it.
5.  Let the rug air out over the weekend.

Here's some random information answering questions from social media.  If you are dying to know where the rug is from - it's from Ikea.  The bright circles are sit spots which velcro to this rug with no problem.  "Does it repel lice?"  According to the manufacturer it does not repel lice.  I've seen quite a bit of natural products that help deter lice.  I would keep my students from laying on the carpet to help with the little critters.  Feel free to leave any questions that you may have below.

All About Dinosaurs In The Classroom


If you want to have the happiest students ever, teach them all about dinosaurs! They absolutely love it.  When I first started teaching I was very much by the books and did exactly what the district told me to do.  As I became better at my craft I realized that I could teach the standards that the district wanted more thoroughly with engaged students if I used topics that the students wanted. The big bonus is that student behavior is much better when they love what they are learning.  Every year I give an interest survey and every year dinosaurs are on the top for students. In this post I will walk you through a week of learning about dinosaurs.


The very first part of every lesson for me is the engagement piece.  I want to hook the students in so that they are invested in what they learn.  For Dinosaur week I created a control panel and taped it outside of our classroom.  As students walk in I had them press their lunch number in, scan their finger and get their security badge.  They were so excited and this was very little effort for me.


The first lesson's objective was to learn how figure out unknown vocabulary that the students would encounter through independent reading.  We read a dinosaur passage together whole group and circled unknown words.  We walked through the word "fossil" together on a 4-square vocabulary organizer which you can see below.  Before we filled the organizer out, I gave the students salt dough and had them make a fossil.  This hands-on activity allowed them to see first hand what the vocabulary word was.  This helped the students to master the skill of learning unknown words.  Now they're ready to tackle those words on their own.  If you click on the photo above it will take you to another post where you'll learn how to make this salt dough.  As a side note, it takes at least a week to dry the fossils so starting on day one helps.


 On day two we moved into reading about dinosaurs with partners.  Each group was assigned a station with books.  The partner's had to find an unknown word and fill out a 4-square.  At the end of the lesson the partners shared their 4-squares with the class.


Days 3-5 were spent studying different dinosaurs independently.  Each person received a leveled passage about a specific dinosaur, a 4-square and dinosaur writing paper.  The first day they figured out any unknown words and shared them with the class.  Then they moved on to finding important details and writing about their dinosaur in an informational piece.  At the end of the week they shared their writing with the class.  Through this week's lessons they were able to learn a variety of informational standards which included:  main topic, vocabulary, key details and informational writing.  It was a fabulous week.


If you are too busy to create all of the materials including differentiated reading passages that your students need, click below to find my Dinosaur Unit.  Included are 6 different passages on:  dinosaurs, paleontologists, T-Rex, Stegosaurus, Velociraptor, Triceratops and a ton of other resources!!


You may also like partner pairing cards.  These cards get your students up, moving and thinking about the days lessons before they start!


Reading Notebooks Made Easy


Set up reading notebooks with your students in a proactive way that frees up time in each of your lessons! Reading notebooks are great way to store tools and information for students that they can reference throughout the year. Reading notebooks also allow teachers to have a concrete example of student work that proves mastery of standards. If you choose to put mini anchors in your reading notebooks then you can free up wall space in the classroom and create a calm environment for your students.  Click on the picture above for a free how-to video on setting up reading notebooks.

Fidget Ball DIY


Do you have students who need a way to get out their fidgets, anxiety or extra energy while they're learning? A fidget ball may be just what they need.  Read below to see how you can make them yourself.

Supplies:  balloons, sand, funnel, pen, scissors

1.  Blow up balloons to stretch them out.
2.  Place the stem of the balloon over the stem of the funnel.
3.  Fill the balloon with a hand-full of sand.  Use the pen to push the sand down if needed.
4. Tie the balloon and place another balloon over it with the stem facing the opposite way.  
5. Cut the stem off.
6.  Repeat steps 4 and 5.
7.  Keep extra balloons on hand in case they become pierced.

Make sure to follow all of the directions on the packages with safe balloon use.  Below you will find some rules that will help keep you sane.

1.  Students should leave the ball on a surface at all times.
2.  Students should not pinch or poke the ball.
3.  Students can roll the ball on their desk with their palm as long as they pay attention to their task.
4.  Students can press the ball.
5.  If students mistreat the ball it should be taken from them.

Hatching Chickens in a Classroom


Are you interested in hatching chickens with your class? If so I can promise they will be the happiest students who forever remember the experience.  I can also promise you that it will be the grossest lesson you have every taught your students, but well worth it.

Supplies that you will need:  fertilized eggs, incubator, brooding box (you can use a large cooler), heat lamp, thermometer, paper towels, rubber gloves, safe cleaning solution,  chicken feed and waterer.

You might want to work with a local farmer to get the supplies you need.  At the very least, you will need someone to return the chicks to once they are hatched.

We found the book below at out local library.  It has all of the information that you will need to hatch chicks.


Follow the directions with your incubator to keep the right humidity and temperature for your eggs. Both are very important for the duration of the incubation cycle.  Remember to not open the incubator unless you need to add water for humidity.  You will be able to keep the incubator at school for most of the hatching cycle (if you're allowed).  If you see a pip in the shell like seen below, you will have on average 24-48 hours before hatching.  You don't want to unnecessarily move the eggs close to hatching, but you don't want a chick to hatch and be left in the incubator for more than 24 hours. You'll have to make the best judgment for your class.


Once the chick hatches it can be left in the incubator for up to 24 hours.  I removed my chicks once they were almost dry.


Once the chicks are dry you will place them in a brood box with a heat lamp.  You won't want to place them with older chicks that could peck them.  The brood box should start at 95 degrees and be reduced 5 degrees each week until they are 20 days.  It's important that the box is large enough so that chicks can be under the lamp when they want and cooler on the other side when needed.  You need to keep the room quiet and not handle the chicks for the first 24 hours or so.  If you have to hatch the chicks at your home rather than school because of timing, let the chicks stay at your home for a couple of days.  They don't do well with transportation after hatching.
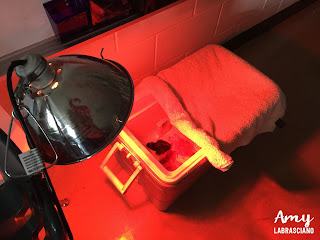

Chicks can eat and drink right after hatching.  Keep food and water in the brood box.  Once they start eating the box will get dirty often.  You'll have to pull the paper towels out of the box and wipe it down several times a day.  Students love to do this.  Make sure they wear gloves and the cleaning solution is safe for both the children and box.  You'll need to bring the chicks home each night because it is not safe to leave a heat lamp unattended.

I kept the chicks at school for one week before I returned them to their farm.  It's a lot of work and that's all our schedule and my patience could handle.


 Here's our happy little chicks!

If you would like to read about our chicken lessons and find materials to teach your students with, click on the picture below for another blog post.



Teaching About Chickens In The Classroom


Students love learning about animals in the classroom.  Teachers love teaching about animals because it's engaging for the students, they pay attention and they can tie a lot of subjects together very easily. Teaching about chickens can allow you to easily cover every informational reading standard, life cycles, habitats, basic needs and similarities between adult and new chicken.


Chicks and Chickens by Gail Gibbons is a great book about all things chickens.  It has a ton of information that's relatable and easy for students to understand.  You could very easily teach all informational standards with this book.


Students can read about the chicken lifecycle to cover part of your lifecycle science standard.  You can use the reading to introduce students to new vocabulary lessons, key details, informational text features, retelling and informational writing.  Consider having the students write the lifecycle to explain how steps connect to one another.

Have students identify the main topic of paragraphs by splitting the book up amongst students groups.  They can construct posters with the information and share it with each other to cover listening and speaking standards.

If you've read about other birds in class, have students use the key details from both texts to compare and contrast the two.


Once students have read about chickens you can check their vocabulary knowledge by building a chicken flip chute.  On one side of a card you place the vocabulary word.  On the other side of the card you place the definition.  Students work with a partner to recall vocabulary.  Flip chutes are simple to make and the students have a great time with them.  If you aren't familiar with them you can watch a video on how to make them here.

If you would like to up the engagement even more and hatch chickens in your classroom, scroll all the way to the bottom for a link.


If you are too busy to pull together and create everything that you need for an amazing unit for your students, click below for the Chicken unit that I've created.