Learning Lessons with Mrs. Labrasciano Home Shop Instagram Pinterest Email Image Map

Behavior Plans Galore!!!

Have you ever had one of those school years? One where you are counting down the days until you can start over again.  This is the year for me.  Now don't get me wrong I love my students.  I'm not wishing away my life or anything.  However, student behavior is wearing me out.  I have learned through blogging that we aren't in it alone.  I recently called out an S.O.S. on Instagram.  I told my friends that I need some new behavior plans.  The best part was that they didn't judge, they came to the rescue.

I went to the Dollar Store and purchased solar powered dancing bugs and needed a plan.


                              More Time 2 Teach


My fellow Florida blogger Melissa from More Time 2 Teach had an excellent plan  Read it below.

I loved this idea and used it last week.  It was a hit with the kids.  Sometimes, with REALLY challenging behavior, I find that I just have to keep mixing up the behavior plans to make it work. So I'm using every one's suggestions.


Julie from A First For Everything directed me to her blog where she posted her behavior plan.  It's a great idea and one that we should all check out.

Emily from Fourth Grade Rock Stars said
Amy from Fun In Room 3 suggested

I especially liked Amy's idea, because her name is Amy, no really because it builds intrinsic behavior.  My favorite!!!!

Below are some more ideas from my Instagram friends:


The Inspired Owl's Corner came up with the cutest class reward system using cupcakes.  Check out her blog to see what it is all about.


Designing A Classroom On A Budget

Get all of your library bins from the Dollar Store.  

Classroom Decor

Teachers spend a large portion of their lives in their classrooms.  We want to enjoy being in our classrooms. So why not make it pleasing to the eye? I promise you that it doesn't have to break the bank.  My top 2 rules for putting together a classroom on a budget are:  1.  Look at what you have before you decide what you want your class to look like.  2.  Only choose a color theme.

Recycle, Reuse, Repurpose
Look to blogs like The Clutter Free Classroom, The Organized Classroom and Pinterest for classroom ideas. My classroom Pinterest Board has been collecting ideas for me for years now.  Once I have an idea of what my choices are, I look around to see what I have. This is a win-win situation.  You  will de-clutter everything and save the Earth by repurposing items.  Here are a couple of examples:
 The coupon bucket came from my daughter's junk I mean bedroom.  I added stickers and ribbon and there we have a cute bucket that didn't cost me anything.  Now if you don't have stickers and ribbon waiting at home for you, look for sales.  Joann's sells the ribbon on the bucket for pennies on sale.  Walmart has alphabet stickers for $1.  The Target Dollar Spot is stocking decorative tape now.  I stock up whenever I see them.  My rainbow wall in my class library was donated by my aunt.  She had left over streamers and gave them to me.  This wall set the color pattern for my room.  Bright and colorful.  Yes, yes the fire marshal hates me. Just do what you can.  The bookcases are old rusted library carts.  They had seen better days.  So my principal isn't going to get mad when I take duct tape to hide the rust.  If she would have been mad, I would have taken off the tape.  The bench is hard to see, but it is milk crates turned sideways.  I then made a cushion and screwed it into the milk crates.  Now I have a bench that has storage for more books.  There is a tutorial for this bench on my Pinterest Board
.
Bright Classroom Decor

This is a picture from my classroom last year.  It has a better picture of the bench in it.  Here you can see how it's o.k. to do a little bit every year.  The tool cart came from Harbor Freight.  I waited until it went on sale and had a coupon.  It used to be red.  I primed it and painted it blue and added drawer liner.  I have repurposed this cart now to be my desk.  It holds all of my important junk.

Bucket Seats
I get the most questions about my bucket seats.  My buckets cost $2 from Firehouse Subs.  Firehouse Subs donates my $2 to local charities.  How great is that? There are tutorials for making buckets seats on Pinterest.  I used left over scrap paper and mod podged it to the bucket.  I then put a nice thick layer of mod podge on the top of the paper.  Now mod podge can be expensive.  I have seen recipes where they just add water to Elmer's glue.  Why not give it a try?

When you need to print posters and such, print on bright colored paper.  This makes the room look colorful and you don't have to buy expensive charts.  The Clutter Free Classroom has a great Blackline Design Pack that has schedules, word wall, and other fun stuff in it for around $10.  You could order the copy paper with supply money and print these at school (hopefully).  

So now you have ideas, a color pattern and have taken inventory of what you have.  It's time to set a budget.

Budget
Pick a realistic budget and stick to it.  I usually set $100 a year.  While I want a beautiful classroom, I don't want to be poor.  This is my job, don't gasp, but it comes second to my family.  Nothing will make your classroom look better than having it organized and junk free.  Plan out how much you want to spend on duct tape, paint, book bins, etc.  If there is one special item that you want, price it out and see where you can get it the cheapest.  The more time and labor that you put in, the less money you will spend.

I'll leave you with some extra pictures and a funny.  I am changing classrooms next year and moving in with another teacher.  Can't wait to tell you all about it.  She told me she wants to do a Camping Theme. A theme!!!! What? Oh my.  I told her we have to keep my bright colors and will go from there.  My first find for the class was free. I had a friend save their tree stumps (logs) for me and cut them to seat size.  So we already have a fun seating area.  I'll make sure to give you a step by step blog along with prices.


Classroom Decor

Student Notebooks in Primary Grades


When I taught all subjects I focused on science and math interactive notebooks.  For some reason in my mind these subjects naturally seemed to fit into notebooks.  For the last two years I have only taught reading and writing.  This gave me the opportunity to work on reading notebooks.  This is especially important now that we are writing so many reading responses in 1st grade.  It turns out that the kids are really good at adding to notebooks when you set clear procedures, rules and rubrics.  Below you will find directions for creating reading notebooks and implementing them.

Creating Notebooks
1.  Start with a spiral notebook.  I choose spiral notebooks because parents can get them super cheap at the start of the school year.  I stock up on extras as well.
2.  Have the students glue a cover to the notebook with stick glue.  They won't need a lot because we will put contact paper on it.  If you are using copy paper, you will need to cut it down a bit first.  Just trim the edges.
3.  The students get to decorate the cover now.  They will give it their own personal touch.  This step is really important because it is this point where they buy into the notebook.  They take responsibility for it.

4.  After they decorate the cover, we discuss rules for reading notebooks.  I have them printed up and we put them inside the front cover.

5.  After we discuss the rules, we talk about how they will be assessed on their notebook.  I also have this printed up so that they can check their work.  We put this inside of the back cover.
5.  The final 2 steps are for the teacher or a parent volunteer.  It can take a couple of hours depending on the amount of students that you have.  I cut down contact paper to put over the front cover.  I'm pretty good at eyeballing it now.  You may want to measure and cut it about 1/4" shorter than the sides.  Then you get to peel and stick the cover.
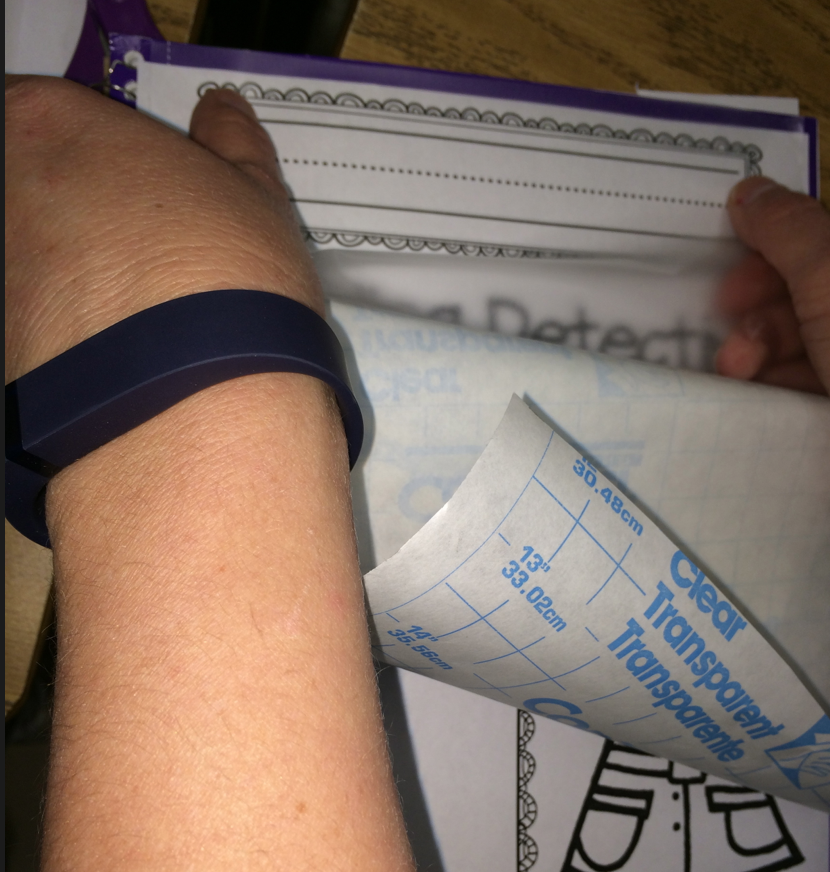
6.  The final step is what makes it super cute and useful.  I place tape over the spirals so that they don't get stuck together in our storage caddies.  We store all of our materials by groups on bookshelves. I used to use duct tape which is super cute, but it can be expensive.  It would take 2 rolls for 36 students.  I have recently discovered that Target keeps the Dollar Spot stocked with decorative tape that works great! It only took 2 rolls to complete 36 notebooks.  I like to differentiate between boys and girls when possible to make it quicker for them to grab the notebooks out of the tubs.

Tips For Using The Notebooks
The main time that I use reading notebooks in the classroom is during silent reading or read-to-self time.  The students have 30 minutes for the process.  The first 20 minutes are for reading.  Prior to reading I give them a purpose for reading.  The purpose comes from common core standards.  It usually reinforces the standard in shared reading. Sometimes it is to help on something that we were struggling in.  I created a template for them to use with every standard.  One example might be to find your informational book's topic and 5 supporting details.

During the 20 minutes of reading the students are coding with post-its.  Any time they see a place that can help them with the purpose of the day they stick it and code.  If we use the example of topic and details from above, they will place a post it by what they believe is the topic and one by each key detail they find or up to 5 details.  

The last 10 minutes of reading time is used for responding to what they read.  They will use their post-its to guide them to the book where they will write about the topic and 5 key details.  

I hate to waste post-its!!! We recycle them and place them in our notebooks to use another day.  When they don't stick or are yucky, we throw them away.

I hope that this helps you to implement reading notebooks in your classroom with success!!! Leave a comment if you have any questions.


Pumpkin Jack

In October a fabulous teacher friend, Ms. Lankford told me about a book titled, "Pumpkin Jack".  She told me that I had to have it.  Of course I wanted to see what all of the fuss was over and ordered the book.  In the book, a little boy carves a pumpkin that he took from his garden.  He loved this pumpkin. When it started to decompose, he took it back out to the garden.  The book shows the pumpkin go through the decomposition process and then through it's lifecycle.

Around the same time, we had our Story Book Pumpkin Reports for homework.  One of the students brought in a Jack-o-latern.  We thought that it would be the perfect opportunity to see if "Pumpkin Jack" was a fiction or informational text.  So we put him in our school garden.  Of course I will introduce the genre of realistic fiction to the students later in the year.  For now it's fun watching them think, think, think.

So why am I writing about pumpkins in January? Take a look at whats happening to Jack...
Story Book Pumpkins

Pumpkin Jack


Science With Pumpkins

We are extra thankful for our AGP teacher Ms. Gwin for helping us to care for Jack.  Her class is conducting a long term investigation with him.  What fun!!!

Florida Bloggers


I have teamed up with Mary, Lisa, and Tammy to host a fabulous Florida Teacher Blogger get together in Orlando on March 1.  If you are a Florida Blogger I hope that you can make it.  We are sure to have lots of fun!!! Just message us to RSVP.

A BIG shout out to Sarah from EduClips for helping us with the fabulous Florida clipart.

New Year's Giveaway

I'm so excited to be a part of Erin from Learning to be Awesome's  giveaway!!! She has some great prizes. Take a look to see what she has to say below...

I've been waiting all week to make this go live!!  And it's finally here.  Some amazing bloggers have generously joined up with me here to give you this three part amazing giveaway!!  Thank you so much guys, you really are awesome.  Check them all out below.

About 3 weeks ago some awesome things happened...

1 - My blog was made over/the name was changed!
2 - I hit 100 followers on Bloglovin
And now that it is January, I'm about a month away from my very 1st blogiversary!! I don't have any cute images to tie that all in together sorry - I am not that creative... But never the less there is a huge give away going on down below - so what are you waiting for!! Get in on the action and win yourself some HUGE prizes.


Rosie's Rambles

Engaging in a Creative Classroom

Learning Lessons with Mrs. Labrasciano


Ramona Recommends

The first prize is a massive $50 to spend at either Amazon, or TPT.  When you win, you get to choose.
a Rafflecopter giveaway
The second prize is an awesome prize pack of some great products from the wonderful people above!! (Thanks again guys).
a Rafflecopter giveaway
And just because I think you are all amazing, I have thrown in a third prize - which I'm super excited about. A 12 pack of Frixion erasable coloured pens.  These are like felt tips (marker pens) that erase like magic!! I love them, and would be knocked over with a feather if you didn't love them too!!
a Rafflecopter giveaway